


 Posts
Posts


Sometimes a crowd character tries to steal the limelight:
Sunday, November 2, 2008

Wednesday, October 8, 2008
RenderMan for Maya Notes
There's not a whole lot of RenderMan for Maya tutorials out there, so I'm collecting all the little nuggets I've gotten from various blogs on this post:
Turn off the default Final pass that contains all the objects in the scene (useful when rendering out multiple passes)
setAttr "rmanFinalGlobals.rman__torattr___computeBehavior" 0;
To generate a shadow pass
Use the 'Occlusion Direct' ancillary output
To generate a multi-pass OpenEXR
In the pass, under Output, right-click and select Create Output->Custom. This pops open a list from which you can select multiple outputs
For 16-bit vs 32-bit, under Extra Output Settings for the pass, select and add 'OpenEXR Pixel Type'. 'Half' is 16-bit and 'Float' is 32-bit.
To create a Matte
Select a Material, open the Attribute Editor and add the custom RenderMan for Maya attribute "Matte Object". This attribute works the same way as the "Black Hole" setting in Maya Software/Mental Ray.
Jordan Reece Halsey's blog has a good tutorial that walks through a Global Illumination example using point-based techniques.
Confused about shading rate and the render quality in general? Check out:
http://www.renderman.org/RMR/st/PRMan_Filtering/Filtering_In_PRMan.html
Cheat Sheet from above site:
"
I don't go below 0.5 for my own shading rate, and usually stay at 1, and use the relationships defined above to compute the appropriate parameters for my renders.
--------
Also, when enabling Motion Blur, values of Motion Factor greater than 1 automatically drop the shading rate of motion blurred objects, which may or may not be desirable. I use this feature to speed up my Ambient Occlusion pass because AO is more noticeable when the object is not moving.
Turn off the default Final pass that contains all the objects in the scene (useful when rendering out multiple passes)
setAttr "rmanFinalGlobals.rman__torattr___computeBehavior" 0;
To generate a shadow pass
Use the 'Occlusion Direct' ancillary output
To generate a multi-pass OpenEXR
In the pass, under Output, right-click and select Create Output->Custom. This pops open a list from which you can select multiple outputs
For 16-bit vs 32-bit, under Extra Output Settings for the pass, select and add 'OpenEXR Pixel Type'. 'Half' is 16-bit and 'Float' is 32-bit.
To create a Matte
Select a Material, open the Attribute Editor and add the custom RenderMan for Maya attribute "Matte Object". This attribute works the same way as the "Black Hole" setting in Maya Software/Mental Ray.
Jordan Reece Halsey's blog has a good tutorial that walks through a Global Illumination example using point-based techniques.
Confused about shading rate and the render quality in general? Check out:
http://www.renderman.org/RMR/st/PRMan_Filtering/Filtering_In_PRMan.html
Cheat Sheet from above site:
"
- ShadingRate - should be 0.25 or smaller for final images. Smaller shading rates may be needed for large displacements. Larger shading rates may be needed if the render is too slow, but image quality will suffer.
- PixelSamples - should be at least 8 in each direction for a shading rate of 0.25 and should never be less than 2 / sqrt(ShadingRate). Even numbers of samples are more efficient for many kernels. Larger numbers of samples may be needed for motion blur.
- ShadingInterpolation - should be "smooth".
- PixelFilter - start with the mitchell 4.0 filter. To soften and/or reduce aliasing, increase the width up to 5.0 (fractions are ok!). For a sharper filter, use a custom Mitchell with controllable sharpness (using a RIF plugin for example); or, use one of the recommended standard filters: separable-catmull-rom 4.0, lanczos 4.0 to 6.0.
I don't go below 0.5 for my own shading rate, and usually stay at 1, and use the relationships defined above to compute the appropriate parameters for my renders.
--------
Also, when enabling Motion Blur, values of Motion Factor greater than 1 automatically drop the shading rate of motion blurred objects, which may or may not be desirable. I use this feature to speed up my Ambient Occlusion pass because AO is more noticeable when the object is not moving.
Tuesday, October 7, 2008
8 rules for writing a short story
From http://en.wikipedia.org/wiki/Kurt_Vonnegut#Writing
In his book Bagombo Snuff Box: Uncollected Short Fiction, Vonnegut listed eight rules for writing a short story:
1. Use the time of a total stranger in such a way that he or she will not feel the time was wasted.
2. Give the reader at least one character he or she can root for.
3. Every character should want something, even if it is only a glass of water.
4. Every sentence must do one of two things—reveal character or advance the action.
5. Start as close to the end as possible.
6. Be a Sadist. No matter how sweet and innocent your leading characters, make awful things happen to them—in order that the reader may see what they are made of.
7. Write to please just one person. If you open a window and make love to the world, so to speak, your story will get pneumonia.
8. Give your readers as much information as possible as soon as possible. To hell with suspense. Readers should have such complete understanding of what is going on, where and why, that they could finish the story themselves, should cockroaches eat the last few pages.
Vonnegut qualifies the list by adding that Flannery O'Connor broke all these rules except the first, and that great writers tend to do that.
In his book Bagombo Snuff Box: Uncollected Short Fiction, Vonnegut listed eight rules for writing a short story:
1. Use the time of a total stranger in such a way that he or she will not feel the time was wasted.
2. Give the reader at least one character he or she can root for.
3. Every character should want something, even if it is only a glass of water.
4. Every sentence must do one of two things—reveal character or advance the action.
5. Start as close to the end as possible.
6. Be a Sadist. No matter how sweet and innocent your leading characters, make awful things happen to them—in order that the reader may see what they are made of.
7. Write to please just one person. If you open a window and make love to the world, so to speak, your story will get pneumonia.
8. Give your readers as much information as possible as soon as possible. To hell with suspense. Readers should have such complete understanding of what is going on, where and why, that they could finish the story themselves, should cockroaches eat the last few pages.
Vonnegut qualifies the list by adding that Flannery O'Connor broke all these rules except the first, and that great writers tend to do that.
Sunday, September 28, 2008
Shot 3 Comped
Took the settings of the last couple of shots, then added haze and subtle grain, blurred the horizon, added a ramp to the sky, and crushed the blacks a little (composited in After Effects).
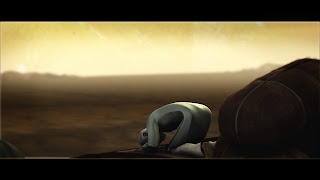
Shake has been discontinued, and the compositor that everyone is shifting to is Nuke, but for my film, I'm thinking of continuing with After Effects because I'm happy with these results and AE now handles .iff files, which is what I render out of Maya.

Shake has been discontinued, and the compositor that everyone is shifting to is Nuke, but for my film, I'm thinking of continuing with After Effects because I'm happy with these results and AE now handles .iff files, which is what I render out of Maya.
Friday, September 26, 2008

Monday, September 22, 2008
More Style Frames
Finally started to render today. Did a quick style frame for fun.
Before:

After Color Correction:


Before:

After Color Correction:

Update - a couple more iterations that I went through on the look:
~December 2008

Final image:
~May 2009

Sunday, September 7, 2008


Subscribe to:
Posts (Atom)